Quantcast
Channel: Ivanovo
Viewing all 83 articles
Browse latest View live

Tunneling SSH through Restrictive HTTS Proxy

$
0
0

In one of past articles I’ve described how to use HTTP CONNECT method to tunnel other protocols through a proxy.  It worked for me for various protocols ( mainly email access IMAP, SMTP),  but recently it stopped working for SSH protocol. After some investigation I’ve found  that proxy is checking  what protocol it is tunnelling through and expects it to be SSL/TLS.  If it is anything else, proxy closes connection with an error.  It still worked for mail protocols,  because they were already wrapped in SSL. But to be still able to use SSH through proxy some more sophisticated setup was needed –  tunnelling SSH through SSL protocol, which is then tunnelled via HTTPS proxy ( HTTP CONNECT method).  Below I describe a setup,  which works for me.

 Tools used

All tools could be installed from Ubuntu/Debian repositories via apt-get.

stunnel4 –   is a program that can wrap/unwrap any connection into/from SSL protocol
openssl – SSL utilities and SSL client
proxytunnel –  utility to tunnel connection through HTTPS proxy

 Sever Setup

On SSH server we have to install stunnel4 and openssl and configure it to accept SSL on some port and forward then unencrypted connection to local SSH server:

sudo apt-get install stunnel4
#generate key - we are not interested very much in security so can use rather minimal settings
openssl req -newkey rsa:1024 -sha1 -days 3650 -keyout stunnel.key -nodes -x509 -out stunnel.crt
cat stunnel.crt stunnel.key > stunnel.pem
sudo cp stunnel.pem /etc/stunnel/
#enable stunnel - set ENABLED=1
sudo nano /etc/default/stunnel4
#edit configuration - see below
sudo nano /etc/stunnel/stunnel.conf
#and start stunnel server
sudo service stunnel4 start

Here is configuration file stunnel.conf:

pid = /var/run/stunnel.pid
cert = /etc/stunnel/stunnel.pem
[ssh] 
accept = 192.168.1.110:2222
connect = 127.0.0.1:22

On Client Behind Proxy

We need to install proxytunnel here. Then following command will connect us to remote SSH server via HTTPS proxy:

ssh -o "ProxyCommand /usr/bin/proxytunnel -v -p proxy_host:port -d ssh_server_host:2222 -e" user@ssh_server_host

And we can add proxy configuration to ~/.ssh/config:

Host ssh_server_host
       ProxyCommand /usr/bin/proxytunnel -v -p proxy_host:port -d ssh_server_host:2222 -e

And then connect easily just with short ssh command:

ssh user@ssh_server_host

Possible Improvements

This article describes how to use haproxy to serve both HTTPS and SSH (tunneled in SSL) on same port, e.g. 443 – so service will look like normal secure web site.


Subtle evil of close_fds parameter in subprocess.Popen

$
0
0

In python newly created sub-process inherits file descriptors from parent process and these descriptors are left open – at least this was default till python ver. 3.3. subprocces.Popen constructor has parameter close_fds (defaults to False on python ver. 2.7), which can say if to close inherited FDs or not.  Leaving them open FDs for child process can lead to many problems as explained here and here.

I was also hit by this problem in very strange manner –  when working on btclient I experienced strange behaviour in HTTP client (based on urllib2), when a sub-process was launched HTTP requests behaved slightly differently – which caused remote server to return many 503 errors.  This was very weird, and it was driving me mad, until I tracked it down to the issue of inheriting opened file descriptors in sub-process.

I still wonder how exactly can sub-process ( it was basically any program – even something as simple as bash -c "sleep 1000" – it was just enough to inherit opened FDs) influence behaviour of socket ( on linux platform) and thus behaviour of HTTP  protocol. I’d be glad if somebody more profound in linux  can explain me exact mechanism behind this.

OpenSubtitles provide easy to use API

$
0
0

When working on btclient, I was interested in possibility of downloading a subtitles for a video file, that is played. This seems to be common option in many player.  I’ve found that opensubtitles.org provides XML-RPC remote API,  which is very easy to use. With help of python xmlrpclib module, it’s really a matter of minutes to create a simple working client.

The real trick then consists in finding right subtitles, which are synchronized with video file.  Opensubtitles provides here useful help – so called moviehash –  this hash is calculated as (file size) + (checksum of first 64kB of file) + (checksum of last 64kB of the file).  Hash is easy and quick to calculate and can be used to search subtitles.  The moviehash is also being uploaded by video players, which can update moviehash when finishing to play video file with certain subtitles, thus giving evidence that this subtitles matched given video file.

But not always subtitles is found by moviehash,  then  other search options are available: by tag (one of tags if filename) or full text query.  However then subtitles returned may not by synchronized – and it’s  then at discretion  of user (or advanced client program) to choose right one.  One of easy to use heuristics could be to use for keywords –  like: if movie file name contains BluRay or BRRip or BDRip  then subtitles file name should contain also one of these strings ( based on an observation that BlueRay rips usually have same timing).

Moviehash can be easily calculated even in streaming clients ( like btclient ), if client supports seeking. First and last 64kB are  seeked and read before video is played.

My implementation of  opensubtitles.org client, in python, is available here. Couple of implementation notes:

  • default xmlrpclib transport does not support HTTP proxy – but this is easily fixed by using transport based on urllib2
  • opensubtitles.org servers are not very stable, often overloaded and returning 500 error  for searches – so  some retries are needed to get  subtitles more reliably –  internally client has possibility of retries in download_if_not_exists function
  • moviehash is calculated from file-like objects (to enable calculation from streams)

Video Streaming from File Sharing Servers

$
0
0

As I’ve written video files can be streamed via Bit Torrent protocol. Although responsiveness (time to start, time to seek) is notably worst that in specialized solutions, it is still usable for normal user, with a bit of patience.

Video files are also provided by file sharing servers,  but in many cases download rate is limited, so it’s not enough to stream video file. However it’s often possible  to open several requests for same file, and combine download rate – this method is quite common in download managers. And if we add possibility to stream downloaded content to video player, we can achieve satisfactory results, possibly similar as or better then streaming via Bit Torrent.

Inspired by my previous work on btclient (video streaming via Bit Torrent protocol), I extended it to stream video also from HTTP source,  with possibility of several concurrent connections.  Video file is divided to pieces (2MB, similarly to BT) and pieces are downloaded by concurrent connections as needed.

In order to enable seeking, pieces are scheduled in priority queue (heap),  with a piece at current playing point and next few following  pieces having highest priority (similar to piece deadline in libtorrent – priority set concept explained in previous article ). Otherwise pieces are downloaded sequentially.

General principle of client operation is:

  • Start first connection, begin with resolving given URL to final link to video file (we use plugins to enable  easy adaptation of  client for different services)
  • Get first block to get file size, calculate number of pieces
  • Start  next x connections (again starting with resolving URL – each connection is basically independent client/user agent from point of view of the server) , each one taking  a piece at time  from priority queue and downloading it
  • Combine pieces together
  • Server them via HTTP server on local computer
  • If seeking is initiated via HTTP request, and a piece mapped for given seek offset is not already downloaded,  piece is added to  priority queue with highest priority,  and following 5 pieces with decreasing priority (but still higher then normal priority).

The concept was tested on uloz.to file sharing service,  together with some of my previous work on decoding audio captchas ( to help here to resolve video file link) I was able to start to playback of  HD content after app. 40 seconds,  and live play  relatively reliably video files encoded with byte rate up to 800kB/s, streaming them from 4 concurrent connections (having download rate about 1000kB/s).


Check UPnP port mapping on you router

$
0
0

Most modern SOHO routers (like my Asus) support UPnP IGDP  or NAT-PMP protocols to enable hosts on local network to open and map incomming (from WAN) port on router.  While these two are different protocols with different origins, they both serve same purpose, so often they are enabled by a single option in your router configuration ( like in my Asus – there is only one option ‘Enable UPnP’,  but in fact it enables both protocols).

This automatic incomming port port management is very convenient, however it can cause some security problems  in your local network.  Because normaly  neither UPnP nor NAT-PMP is authenticated, all local subnet is basically trusted, it means that any program can open incomming port, as it needs (including  malware programs).  More detailed description about potential UPnP issues is for instance here.

So if you after all decide to enable UPnP on router ( because your children need it for their online games and torrents :-),  how can you check which ports are really opened?  Normaly router ( at least my Asus) – shows only manual mappings – but there is nifty small utility called PortMapper, written in Java, which can discover router on loacal subnet and show all UPnP and NAT-PMP port mappings, currently opened on your router.  Packed as jar it can be downloaded and run in few minutes.

Beautiful Code History Visualization with Gource

$
0
0

Gource tool offers very nice and appealing visualization  of SW project history. Gource works with all major version control systems – git, svn, etc.  can be easily installed from Ubuntu repos and is fairly easy to use.

Here is visualization of my btclient project (videos works best in Firefox):

Generated with this command:

gource --file-idle-time 0 -s 1 --auto-skip-seconds 1 --stop-at-end --title BTClient --output-ppm-stream - -r 25 ~/workspace/btstream/.git/ | ffmpeg -y -r 25  -f image2pipe -vcodec ppm -i -  -vcodec libx264 -preset medium -vprofile baseline -level 3.0 -pix_fmt yuv420p gource.mp4


And here visualization of more complex project – libtorrent:

Generated with this command:

gource -s 0.01 --file-idle-time 0  --hide filenames --date-format "%B %Y" --stop-at-end --title libtorrent --output-ppm-stream - -r 25 libtorrent-fixed/.svn/ | ffmpeg -y -r 25  -f image2pipe -vcodec ppm -i -  -vcodec libx264 -preset medium  -vprofile baseline -level 3.0 -pix_fmt yuv420p  gource2.mp4


OpenShift Experiencies

$
0
0

PaaS is happily buzzing in the Cloud and it seems to be hottest topic in the infrastructure  services today,  so I decided to test Openshift –  PaaS  offering  from Red Hat.  Couple of reasons make this platform interesting – firstly it’s open source solution, so we can use it to build your own private solution, secondly on public service we  get 3 gears ( linux containers with predefined configuration) for free forever, so it’s easy to experiment with this platform. As a sample project we will create very simple Python Flask web application with MongoDb.

Intial Setup

After creating account, few actions is required:

  • Install client tool rhc (it’s Ruby based – so we need also ruby interpreter and gem package manager to be installed)
  • We also need git and python virtualenv  (our example is  for python 3)
  • register ssh key with  our account  (this can be done as part of nest step)
  • run rhc setup

Now we are ready for our first application.

Create And Deploy Application

We create application template using  sample application availabe here at github :

rhc app create testpy python-3.3 --from-code https://github.com/izderadicka/openshift-test.git
#beware there is also app-create command, but it will not create local git repo by default
rhc cartridge add mongodb-2.4 -a testpy

Openshift provides base template for many common web application development platforms like python (with django, flask …), php, node.js,  java (tomcat, jboss) etc.   Also for each web application we can add additional ‘catridges’, which are additional services like database, cron, etc.  In our case we add MongoDb cartridge.

First we need to create virtual environment so we can test application locally:

cd testpy
virtualenv -p python3 .
source bin/activate

Next we need to install required python libraries – they should be listed in file requirements.txt. They are installed automatically during Openshift deployment,  however there is one issue there – it looks like by default  Openshift is installing packages from its own mirrors of python repositories and it could not find some packages for this application –  enforcing official repository in requirements.txt helped:

--index-url https://pypi.python.org/simple/

Locally we can install dependencies with:

pip install -r requirements.txt

For Openshift deployment there are two other important files:
setup.py, which is a standard python setup file, here we should edit metadata for our application and add any additional setup tasks (like creating database).  setup.py is also run automatically during deployment.  Here is for instance code to create postgresql database (if we choose postgresql instead of mongo) :

from setuptools import setup
from setuptools import Command
import os.path

class InitDbCommand(Command):
    user_options = []

    def initialize_options(self):
        """Abstract method that is required to be overwritten"""

    def finalize_options(self):
        """Abstract method that is required to be overwritten"""

    def run(self):
        from flaskapp import db
       
        res=db.engine.execute("""
SELECT EXISTS (
   SELECT 1
   FROM   information_schema.tables 
   WHERE  table_schema = 'public'
   AND    table_name = 'thought'
);
""")
        
        exists=list(res)[0][0]
        if exists:
            print('Table already exists, skipping creation')
        else:
            print('Will create table')
            db.create_all() 


setup(name='random_thoughts',
      version='0.1',
      description='Very simple flask app to test Openshift deployment',
      author='Ivan',
      author_email='ivan@zderadicka.eu',
      url='https://testpy-ivanovo.rhcloud.com/',
      cmdclass={'initdb': InitDbCommand},
     )

wsgi.py –  Openshift is using mod_wsgi to run python code,  by default it’s looking for file wsgi.py in the root directory of our code.  For us it’s just enough, to import  flask application, which is WSGI compatible:

from flaskapp import app as application

Openshift also allows us to define custom scripts, which can run at different stages of deployment – so called action hooks. Action hooks can be added to directory .openshift/action_hooks. In our case we  add deploy script, which  enables fulltext in MongoDb configuration.

When our code is ready and works OK locally:

python flaskapp.py

we can deploy to Openshift easily with git:

git push origin master
# we may need to restart app first time due to mongodb config change to enable fulltext
rhc app restart testpy

 Scalable Application

Openshift enables automatic scaling of applications –  when number of connections reaches certain threshold additional  gears with our web application are automatically  created and web traffic is load balanced between  them (Openshift is using HAProxy, installed in the first gear  – it’s so called  Web Load Balancer cartridge).

When application is created it must be explicitly enabled for scaling.   Existing applications cannot be enabled for scaling after creation. So we first need to delete our exiting non-scalable application:

cd ..
rhc app delete testpy
rm -rf testpy

And recreate it as a scalable application ( with -s argument):

rhc app create testpy python-3.3  -s
cd testpy

We try something bit different to get code from github:

git rm -r wsgi.py setup.py .openshift
git commit -a -m 'clean'
# lets use differend branch for deployment
git checkout -b scaled
rhc app configure --deployment-branch scaled
git add remote github https://github.com/izderadicka/openshift-test.git
git pull github scaled
rhc push origin scaled

In this scenario we need shared MongoDb database,  we can use MongoLab from Openshift Marketplace.  Just order MongoLab Free service there and then add it to this application via marketplace UI.  Now our application looks like:

rhc app show testpy
testpy @ http://testpy-ivanovo.rhcloud.com/ (uuid: ...)
----------------------------------------------------------------------------
  Domain:     ivanovo
  Created:    7:49 AM
  Gears:      1 (defaults to small)
  Git URL:    ssh://...@testpy-ivanovo.rhcloud.com/~/git/testpy.git/
  SSH:        ...@testpy-ivanovo.rhcloud.com
  Deployment: auto (on git push)

  haproxy-1.4 (Web Load Balancer)
  -------------------------------
    Gears: Located with python-3.3

  python-3.3 (Python 3.3)
  -----------------------
    Scaling: x1 (minimum: 1, maximum: available) on small gears

  mongolab-mongolab-1.0 (MongoLab)
  --------------------------------
    From:  https://marketplace.openshift.com/api/custom/openshift/v1/accounts/...
    Gears: none (external service)

And we have environment variable to connect to MongoDb:

rhc env list
MONGOLAB_URI=mongodb://xxx:zzz.mongolab.com:37447/openshift_zzzz

So we just need to modify our application to use this connection URL:

app.config['MONGO_URI'] = os.environ.get('MONGOLAB_URI', 'mongodb://localhost/test')

Scaling is configured by environment variable OPENSHIFT_MAX_SESSIONS_PER_GEAR (default is 16), which is maximum number of connections that HAProxy passes to one backend application.  According to the documentation, if number of total connections is sustained at 90% of capacity (max_connections x num_of_gears) for some period, new gear is added (if free gears are available).  Web application is copied to the new gear, deployed, started and added as another backend to HAProxy load balancer.

For better demonstration of scaling we can decrease value of OPENSHIFT_MAX_SESSIONS_PER_GEAR:

rhc env set OPENSHIFT_MAX_SESSIONS_PER_GEAR=8

We can try how application scales –  we use Apache HTTP benchmark tool ab to put some load on our application:

ab -n 100000 -c 100 http://testpy-ivanovo.rhcloud.com/

After a while new gear is added, which we can see with command rhc app show (Scaling: x2).  It still takes quite some time (minutes), before new gear is ready and is added as new backend to HAProxy –   we can see HAProxy status at URL:  http://testpy-your-domain.rhcloud.com/haproxy-status.   Little bit later another gear (last remaining) is added.  Again it takes some time for it to be ready,  then if we again take a look  HAProxy status, we can see that the backend in the first gear is taken down (highlighted in brown) – this is an intended functionality –  according to documentation: ‘‘Once you scale to 3 gears, the web gear that is collocated with HAProxy is turned off, to allow HAProxy more resources to route traffic.

Results from ab may look like:

Server Software:        Apache/2.2.15
Server Hostname:        testpy-ivanovo.rhcloud.com
Server Port:            80

Document Path:          /
Document Length:        2866 bytes

Concurrency Level:      100
Time taken for tests:   1032.052 seconds
Complete requests:      100000
Failed requests:        0
Total transferred:      314133754 bytes
HTML transferred:       286600000 bytes
Requests per second:    96.89 [#/sec] (mean)
Time per request:       1032.052 [ms] (mean)
Time per request:       10.321 [ms] (mean, across all concurrent requests)
Transfer rate:          297.24 [Kbytes/sec] received

Connection Times (ms)
              min  mean[+/-sd] median   max
Connect:      105  142  65.6    131    3137
Processing:   127  889 504.0    774    3597
Waiting:      127  885 501.5    772    3596
Total:        249 1031 503.7    912    4016

Percentage of the requests served within a certain time (ms)
  50%    912
  66%   1049
  75%   1182
  80%   1300
  90%   1887
  95%   2104
  98%   2352
  99%   2540
 100%   4016 (longest request)

Actually when I was observing behaviour of the scalable application, above mentioned rule was not obviously demonstrated (I got around 100 connections to backend, OPENSHIFT_MAX_SESSIONS_PER_GEAR=16, but application was still scaled to 2 gears),  so maybe the scaling is bit more complex.

Finally after a while. when traffic is down, application returns back to 1 gear.  (Application restart will not reset scaling).

Terminal Interfaces in Python

$
0
0

Although there is a fair choice of GUI libraries for Python (good overview of Python GUI libraries is here), sometimes we need just a little bit more enhanced terminal interface, like in my recent project –  XMPP test client  – where requirements were quite simple – just to split terminal screen into two areas –  main screen where messages are displayed (possibly asynchronously) and bottom line, where commands/messages can  be entered:

layout

In Python we have couple of options for terminal UI programming:

  • curses – curses library is part of standard python distribution, it provides lower level access to terminal programming and terminal control sequences.  Many things are left to users – like resizing UI, event loops etc.
  • urwid – is an excellent external library, which provides higher level interfaces for programming terminal UIs. It’s a bit similar to above mentioned GUI kits, providing widgets, layout managers, event loop etc.  And many common tasks missing in curses are already included.

I decided to use urwid, because it looked easier to start with and many required functionalities  were already provided (like already mentioned resizing, which I think would be pretty tedious to re-implement in curses).  I’ve created simple commander module, which provides interface similar to build-in cmd.Cmd, but with UI layout as shown above.   With this module we can create simple tools very easily:

if __name__=='__main__':
    class TestCmd(Command):
        def do_echo(self, *args):
            '''echo - Just echos all arguments'''
            return ' '.join(args)
        def do_raise(self, *args):
            raise Exception('Some Error')
        
    c=Commander('Test', cmd_cb=TestCmd())
    
    #Test asynch output -  e.g. comming from different thread
    import time
    def run():
        while True:
            time.sleep(1)
            c.output('Tick', 'green')
    t=Thread(target=run)
    t.daemon=True
    t.start()
    
    #start main loop
    c.loop()

Which creates tool like this:

ui


Simple Web Applications Deployment via Git

$
0
0

Git is not only great version control tool,  but can be easily used for web application deployment to testing or production environmenst.  For more complex projects some continuous integration (CI), tools/services can be more appropriate  (like Jenkins), but for smaller project we can do just fine with Git , SSH and simple script installed as git hook. Below is the scenario I’m using for one Python Flask web application.

Flask application is deployed on Debian server (running in VM), in uwsgi container behind nginx frontend (nginx is also serving static files).   We have two VMs –  one production and one testing. If necessary production instance can be easily scaled horizontally  by adding more uwsgi instances behind nginx frontend.

Git Flow

We have two long running branches in Git:
devel – for latest development version
master – for production version

Developers work on feature branches, which they can run locally (with Flask embedded WSGI server),  when  features are ready, they are merged to devel branch and  devel branch is then pushed to test instance, where all new features are tested by users.  When we are fine with new functionality,  devel branch is merged to master branch and master branch is pushed to production instance.

Server Setup

This is setup for testing server,  same is for production server,  only that branch for production is master.

1. Install Git

apt-get update
apt-get install git

2. Create bare repo

mkdir -p /var/repo/app.git
cd /var/repo/app.git
git init --bare

3. Add remote

git remote add origin https://our.repo.server.com/repo/app.git

4. Fetch branch and check it out

git fetch origin devel:devel
mkdir /opt/app
git --work-tree=/opt/app --git-dir=/var/repo/app.git checkout -f devel

Now we are ready to run the Flask application, just need an usual setup for Flask:

Server setup – specific for Flask and Python

1. Install base dependencies

apt-get install -y build-essential python python-dev python-pip uwsgi uwsgi-plugin-python nginx-full python-nose 
# optionally you might like to get newer uwsgi - compile it from source

2. Create  uwsgi configuration for your application /etc/uwsgi/apps-available/app.ini

[uwsgi]
buffer-size=32768
socket = /tmp/app.uwsgi
plugin = python
chdir = /opt/app/src #whatever is your main Flask module
master=true
workers=1
threads=2
module = server # whatever is main module name
callable = app
enable-threads=true

And symlink it to /etc/uwsgi/apps-enabled.  Indeed for production configuration you might need other parameters, especially workers and threads.

3. Create site configuration for nginx – /etc/nginx/sites-available/app-nginx

server {
	listen   80 default_server; ## listen for ipv4; this line is default and implied
	listen   [::]:80 default_server ipv6only=on; ## listen for ipv6

	root /opt/app/src;
	index index.html index.htm;

	# Optionally server name
	# server_name some.server.com;

	location /static/ {   # assuming this is location of static files
		# static app files
		try_files $uri $uri/ 404;
	}

	location / {
		include uwsgi_params;
		uwsgi_pass unix:/tmp/app.uwsgi;
	}
}

Remove default nginx site and symlink this to /etc/nginx/sites-enabled.

4. Install necessary python dependencies for you application

# assuming that your project has all dependencies in requirements.txt file
# which is the best practice
pip install -r /opt/app/requirements.txt

5. Restart servers

service uwsgi restart
service nginx restart

 Server Setup – Git hook

Create following file in /var/repo/app.git/hooks/post-receive

#!/bin/bash
set -x -e

BRANCH=devel
WD=/opt/app

REFS=`cat`

if [[  $REFS =~ "refs/heads/"$BRANCH ]] ; then
	git --work-tree=$WD --git-dir=/var/repo/app.git checkout -f $BRANCH
	pip install -r $WD/requirements.txt
	cd $WD
	nosetests
	uwsgi --reload /var/run/uwsgi/app/app/pid
	service nginx  reload
	echo "Succesfully deployed $BRANCH branch"
else
	echo "This is not our branch: $REFS"
        exit 0
fi

This script checks if correct branch is pushed. Eventually it can be easily extended to deploy different branches to different locations.

Client setup

Assuming you already have cloned devel branch to your computer and worked on it.

1. Assure that your SSH public key is set on server

cat .ssh/id_dsa.pub | ssh root@test.server.com "cat >> .ssh/authorized_keys"

2. Add remote repository to your cloned repo

git remote add test-server root@test.server.com/var/repo/app.git

3. When you finished you can just push changes to test server

git push test-server devel

and they will be automatically deployed.

Media Server For Music And Audio-Books

$
0
0

music-7Having updated my mobile  recently (but still staying on Android) to 4G device, I thought that it would be about time to make my audio collection available outside of home network.  At home I use samba share, which is quite fine for most of uses, however enabling access from internet required bit more  effort. In following article I’d like to describe options, I’ve been looking at, and the final solution.

My requirements:

  • Should be able to handle large collections
  • Browse by directory structure (my metadata tags are messy)
  • Clearly separate audio books from music
  • Some search would be nice
  • Preferably open source (at least server part)
  • Linux indeed
  • Reliable playback over Internet on mobile
  • Smart caching on mobile, enabling temporal break-outs in connectivity ( the underground etc.)
  • Possibility to load content for offline playback
  • Should be reasonably secure

Options:

Some Cloud Storage

It was not really option for me.  I do not want cloud service for this.

ASUS AI Cloud

As I’m using ASUS router ASUS AiCloud is one option. If AiCloud is enabled on router, then Android  application can be used to provide access to all LAN shared disks (SMB).  Additionally there is some support for media playback.
I used it for a while, have some issues with android client, which moved me to look for other solution:

  • Unstable – when connection is lost, playback in the client freezes and is not able to continue, when connection is re-established. All application has to be closed and restarted.
  • Just current item is cached, so it can not  get over longer connection drop outs
  • General quality – player interface is ugly,  resumes from paused state after each incoming call etc.

SFTP And ES File Explorer

At home I use excellent ES File Explorer to access shares and it has also SFTP support.
I can access my server via SSH already, so only trick was to enable public/private key use in ES – and it’s very easy – openssh generated key can be used in ES.
However SFTP does not seem to be good for media playback,  it looks like  whole file must be downloaded, before playback starts. Also SFTP seems to be unstable when connection is switched between mobile and WiFi, or it’s unavailable for a short while.

ES also enables WebDAV remote shares, I did not try them yet, maybe they can be better suited for media then SFTP?

ownCloud

ownCloud is PHP application for accessing and synchronizing of  files across different  devices. It is written in PHP. For music streaming it’s using Ampache,  which can be also used as standalone solution, so as media solution ownCloud does not provide anything interesting. See details of Ampache below.

Media Servers

So finally I’ve looked at specialized media servers.   Based on different articles I considered: Emby, Plex, Serviio, UMS, Subsonic/Madsonic and Ampache.

Emby (former Media Explorer) is an open source project. However the music handling does not suite my needs. Music is sorted only by metatags, which causes problems and music and audio-books are messed together.

Plex – is not an open source. It has good references,  but to enable access over Internet one must register it with their Plex service, which meant hard stop for me, because I’d like to have completely independent solution.

Serviio – is not an open source, so I did not try it.

UMS – is focused only on LAN environment (using DLNA), but I need mainly internet access.

Subsonic – is an open source media server written in Java. It focuses on music and it best met my requirements.  It basically sticks to the way how music is organize in the file system, which is absolutely crucial for me, provides super-fast scanning of music directories and also nice Android applications are available (Subsonic, Ultrasonic …), which provide smart caching (you can choose how many songs ahead should be  cached in current play list, so you can easily survive some time without connection) and also it very easy to load content to mobile local storage.  Overall it works quite well, however installation required few tweaks – as described below.

Madsonic –  is Subsonic clone.  It removes dubious shareware like limitations in the program and adds new functionality.  However the interface looks more confusing and the new functions have not been  of interest to me, so I rather stayed with Subsonic (or to be exact it’s clone which removes the trial limitations – see below).

Ampache – open source, PHP server. Installs smoothly to regular LAMP environment. Collection is organized  by metatags, so again no good option for me, it results in messy collection.  Just tried one Android client  Amdroid, which is quite bad – poor interface, alpha quality.

My Choice

For me subsonic is a clear winner,  no other solution gets closer to meet my requirements.
I particularly like:

  • You can browse media by directory structure (with some enhancements, which do not mind so much)
  • Music and Audiobooks can be in separated collections – so it’s easy to browse them
  • Super fast scanning of music directories
  • Smart caching on Android client

Some issues:

  • Do not like their ‘trial’ approach – either software is FOSS or not.  Do not see reason for this, since it is  an open source already (with all sources on sourceforge) and there  is a clone which just removes these trial features.  I think more advanced payed services, more visible donation links could be better alternative.
  • HTTPS option should be better explained –   problem is not that certificate is self signed (I also use other  self signed as an alternative), but problem is that private key is shared! Thus eavesdropper can decrypt your communication and get your password you used to login). Authentication (of server) is not so big issue – Android client for instance does not validate certificate, any self-signed just works.
  • Java is bit resources hungry – especially memory.

Setting Up Subsonic

  1. Install from official site. I prefer stand alone installation, assuming others will be similar.
  2. Replace .war file with one from this fork. This one is patched to remove time limitation of some features.  (It’s not crack – subsonic is Open Source under GPLv3,  so it’s legitimate to create modified version as long as their source is available under compatible license).
  3.  Edit subsonic.sh (or /etc/default/subsonic  appropriately, if you installed package)
    SUBSONIC_HOME=/data/local/subsonic
    SUBSONIC_PORT=0
    SUBSONIC_HTTPS_PORT=4043

    Enable https, disable http.  Set home directory (if different from default).
  4. Also you need to assure that UTF-8 support is in place.  For this ensure that these  variables are set in subsonic environment:
    export LC_ALL="en_US.UTF-8"
    export LANG="en_US.UTF-8"

    Easiest way is to add them to subsonic.sh script ( or /etc/init.d startup script in packaged installation).
    Without these variables subsonic will not recognize files with national characters in file name!
  5. Subsonic comes with pre-packed SSL key and certificate for HTTPS – this is significant security risk, if internet access is enabled. (Anybody can fetch private key from subsonic distribution and then decode your ssl trafic).  Generate new key+certificate and update subsonic-booter-jar-with-dependencies.jar as described here.
    Self-signed certificate would be enough ( just add -x509 -days 3650 to openssl req command).
  6. Enable port forwarding on your home router (either manually or in subsonic network setup enable UPnP NAT PMP
  7. Run subsonic as non-root account


Opus Audio Codec for Audio Books And More

$
0
0

Opus is a relatively new lossy audio codec from Xiph Foundation, successor to Vorbis and Speex codecs.  It provides very good quality for low bandwidth (<32kbps) streams with speech, but also provides high quality for broader bandwidth (>64kbps) and more demanding data like music etc.  So it can be one-off solution for any digital audio encoding.  According to some tests presented on it’s site, it’s comparable with HE AAC for higher bandwidth, higher quality data,  while it additionally  provides better results for lower bandwidth, speech data  this is something xHE ACC is addressing too, however I have not seen available codec yet.).  And what is most appealing on Opus is that it’s free, without patents and it’s open source.  (While majority of common audio codecs e.g MP3, AAC are restricted by patents and are subject to paying loyalties , I think Fraunhofer holds basic patents, but situations is quite complex and differs per country).

Based on positives reviews, I though that Opus could be ideal codec for audio books, where it can provide good quality at low bit rates. At least for me, I really do not need top quality for audio books  (say mp3 128kbps), while the book takes gigabytes of space, but on the other hand,  I do appreciate good quality and for low quality audios I have problems to understand and I cannot really enjoy the book.

So how can Opus help and is it ready for everyday use?

On Linux I can encode audio to Opus inside Ogg container with FFmpeg  ( not every distro has ffmpeg compiled with libopus,  however you can easily use static builds).  I’ve created this script to be able to convert whole directories (even recursively):

#!/bin/bash
BITRATE=24
CUTOFF=12000
APPLICATION=audio
FORMAT=ogg
QUALITY=10

trap "exit 2" SIGINT

for i in "$@"
do
case $i in
    -b=*|--bitrate=*) # bitrate in kilobits  eg. 24, 32. 64 ...
    BITRATE="${i#*=}"
    shift 
    ;;
    -c=*|--cutoff=*) # cutoff - for low pass filter -  4000, 6000, 8000, 12000, or 20000
    CUTOFF="${i#*=}"
    shift 
    ;;
    -a=*|--app=*) # application type - voip, audio or lowdelay
    APPLICATION="${i#*=}"
    shift
    ;;
    -f=*|--format=*) # container format ogg, mkv, webm ...
    FORMAT="${i#*=}"
    shift 
    ;;
    -q=*|--quality=*) # compression quality - 0 fast, low quality - 10 - low high quality 
    QUALITY="${i#*=}"
    shift 
    ;;
    -d|--delete) # delete input file after conversion
    DELETE=YES
    shift 
    ;;
    -r|--recursive) # resurse into sub directories
    RECURSIVE=YES
    shift # past argument with no value
    ;;
    *)
            # unknown option
    ;;
esac
done


if [[ -n "$1" && -d "$1" ]]; then
    
cd "$1"

for FILE in *.mp3;
do
    if [[ "$FILE" != "*.mp3" ]]; then 

    echo "Processing $FILE"
    ffmpeg -nostdin -v error -stats -i "$FILE" -y -map_metadata 0  -acodec libopus -b:a ${BITRATE}k -vbr on -compression_level $QUALITY -application $APPLICATION -cutoff $CUTOFF "${FILE%.*}.$FORMAT"
    
    if [[ $? -ne 0 ]]; then
        echo "Encoding error on $FILE" >&2
    fi
    
    if [[ -n $DELETE ]]; then
        rm "$FILE"
    fi

    fi
done

if [[ -n $RECURSIVE ]]; then
    find . -maxdepth 1 -mindepth 1 -type d -exec $0 -b=$BITRATE -c=$CUTOFF -a=$APPLICATION -f=$FORMAT -q=$QUALITY ${DELETE+-d} ${RECURSIVE+-r} {} \;

fi
exit 0
else

echo "Please specify directory!" >&2
exit 1
fi

I converted several audio books (mp3 96kbps or 128kbps, stereo) with opus parameters defaulted in the above script – resulting Opus 24kbps stereo. I also  compared (listening on headphones (relatively good ones, Jabra) and external speakers (also fairly good, Yamaha) ) opus version to mp3 version and cannot tell any significant  difference in quality,  (128kbps mp3 sounds very slightly better in headphones, for 96kbps I was not able to tell any difference).  The difference in size is however remarkable – opus is 4-5 times smaller.

Support for Opus in Linux (Ubuntu 14.04) is good – I can play it basically in any player (including default audio player Rhythmbox), however I hit some issues with Android (which is now device I use mostly for listening music and audio books).  On Android Opus in ogg container was supported only by VLC player (I believe couple more can play it, but I have only VLC installed).  Natively Android does support Opus, but only in matroska (.mkv) container (from 5.0+ as stated here).  Solution could be to use always matroska,  but I still  prefer ogg, because it’s more common container for Opus.  Since I use Subsonic (see also my previous article) to steam audio books to my mobile I can use transcoding.

Transcoding can be pretty basic, since both containers support Opus, so it’s just about copying audio stream from one container to other, which can be very fast. However there is still a small issue: if conversion is piped to output, resulting mkv container does not contain duration and stream size in header,  so resulting file is not seekable on  Android. Target of transcoding has to be fully searchable (e,g, file) so that ffmpeg can write, duration and size after conversion.  Solution was to create small transcoding script, which uses a temporary file:

#!/bin/bash
if [[ -f "$1" && "$1" == *.ogg ]]; then 
    TMPFILE=`mktemp`
    ffmpeg -y -v error -i "$1" -map 0:0 -c:a copy -f matroska $TMPFILE
    cat $TMPFILE
    rm $TMPFILE
else
    echo "Need ogg file as param" >&2
fi

To improve performance and decrease disk usage we can use tmpfs for temporary files (if we have enough memory):

# put this into /etc.fstab
tmpfs /tmp tmpfs nodev,nosuid 0 0

Final note – I also tried webm container, which should be generally equivalent to mkv (with some limitations),  but for webm seeking in file was not working.

Writing Simple Parser in Python

$
0
0

From time to time one might need to write simple language parser to  implement  some domain specific language for his application.  As always python ecosystem offers  various solutions – overview of python parser generators is available here.  In this article I’d like to describe my experiences with parsimonious package. For recent project of mine ( imap_detach –  a tool to automatically download attachment from IMAP mailbox) I needed simple expressions to specify what emails and what exact parts should be downloaded.

Requirements

I needed a parser for simple logical expressions, which use a set of predefined variables ( properties of email), like these:

mime = "image/jpg" & attached & ! seen

Meaning: Email part is jpg image and is added as attachment and have not been seen yet

name ~=".pdf" & ( from ~= "jack" | from ~= "jim" )

Meaning all email part where filename contains .pdf and is from jack or jim

Grammar

Parsimonious implements PEG grammar which enables to create very compact grammar definitions. Unlike some other parser generators, where grammar in expressed in Python, parsimonious  has it’s own syntax, which enables to create short and easy to overview grammar definitions:

GRAMMAR=r""" # Test grammar
expr = space or space
or = and   more_or
more_or = ( space "|" space and )*
and = term  more_and
more_and = ( space "&" space term )*
term = not / value
not = "!" space value
value =  contains  / equals / bracketed / name
bracketed = "(" space expr space ")"
contains  =  name space "~="  space literal
equals =  name space "="  space literal
name       = ~"[a-z]+"
literal    = "\"" chars "\""
space    = " "*
chars = ~"[^\"]*"
"""

There are  couple of things which has to be remembered, when creating grammar:

  • PEG grammar should avoid left recursion, so rules like
    and = expr space "&" space expr

    Don not work and will result in recursion error ( infinite recursion).  They have to be rewritten as indirect left recursion, which might be sometime challenging.
  • PEG grammar grammar are more deterministic that context free grammars –  so there is always one rule that is matched – there is no ambiguity like in  CFG.   This is assured by deterministic selection  / – always first match is selected and by greedy repetition operators * + ?  (they always match maximum possible length from input).
    Practically this means that rules has to be more carefully designed and they need to be design in particular way to assure required priority of operators.
  • Only named rules can have some special treatment when walking AST tree ( see below).  I think this is special feature of parsimonious,  but AST contains  nodes for a part of rule – like expressions that are in brackets.   This means if I have rule like this:
    and = term ( space "&" space term )*

    I have no control on evaluating the right part, so I rather split it into two rules.

Evaluation

Once we have the grammar, we can evaluate expressions by walking the parsed AST. Parsimonious provides nice support for this with visitor pattern . We can create subclass of parsimonious.NodeVisitor with visit_rulename methods for all (relevant) rules from the grammar.   visit method receives current node in AST and list of values from its already visited (evaluated ) children.

So here is example of NodeVisitor class, that evaluates our simple expressions:

class SimpleEvaluator(parsimonious.NodeVisitor):
    def __init__(self, ctx, strict=True):
        self.grammar= GRAMMAR
        self._ctx=ctx
        self._strict=strict
    
    def visit_name(self, node, chidren):
        if node.text in self._ctx :
            val=self._ctx[node.text]
            if isinstance(val, (six.string_types)+ (six.binary_type,)) :
                val = decode(val).lower()
            return val
        elif self._strict:
            raise EvalError('Unknown variable %s'%node.text, node.start)
        else:
            return ''
    
    def visit_literal(self,node, children):
        return decode(children[1]).lower()
        
    def visit_chars(self, node, children):
        return node.text
    
    def binary(fn):  # @NoSelf
        def _inner(self, node, children):
            if isinstance(children[0], bool):
                raise EvalError('Variable is boolean, should not be used here %s'% node.text, node.start)
            return fn(self, node, children)
        return _inner
    
    @binary
    def visit_contains(self, node, children):
        return children[0].find(children[-1]) > -1
    
    @binary
    def visit_equals(self, node, children):
        return children[0] == children[-1]
   
    def visit_expr(self, node, children):
        return children[1]
    
    def visit_or(self, node, children):
        return children[0] or children[1] 
    
    def visit_more_or(self,node, children):
        return any(children)
    
    def visit_and(self, node, children):
        return children[0] and (True if children[1] is None else children[1])
    
    def visit_more_and(self, node, children):
        return all(children)
        
    def visit_not(self, node, children):
        return not children[-1]
    
    def visit_bracketed(self, node, children):
        return children[2]
    
    def generic_visit(self, node, children):
        if children:
            return children[-1]

This class evaluates expression within context of defined variable’s values (dictionary). So we can parse and evaluate expression with one method:

context = {"name": "test.pdf", 
           "mime": "application/pdf",
           "from": "jim@example.com",
           "to": "myself@example.com",
           "attached": True,
           "seen": False
            }

parser=SimpleEvaluator(context)
result= parser.parse('name ~=".pdf" & ( from ~= "jack" | from ~= "jim" )')

 Conclusion

Parsimonious is a nice compact package for creating small parsers that are easy to use. For myself I bit struggled with PEG grammar,  but that’s probably due to my unfamiliarity with this type of grammars.  Once accustomed to it one can create more complex grammars.


Do We Trust Cloud Storage For Privacy?

$
0
0

With more generic offerings from  cloud storage providers –  up to 50GB free,   cloud storage is tempting alternative to store some of our data. I have some data, which I really do not want to loose. I already have them stored on several devices, however additional copy in cloud could help.  But how much I can trust cloud providers to keep my data private, even from their own employees.  Not that I have something super secret, but somehow I do not like idea, that some bored sysadmin, will be browsing my family photos.  Or provider  use my photos for some machine learning algorithms.

Main providers like Dropbox, Google do use some encryption, however they control  encryption keys, so they can theoretically access your data any time and in worst case provide them to third parties – like government agencies.   From what I have been looking around only few providers like Mega or SpiderOak  offer privacy  by design – which means  all encryption is done on client and they should not have any access to your keys (zero knowledge).   However how much we can trust that their implementation is flawless or that there are not intentional back-doors left? There has been some concerns about Mega security couple years ago,  but no major issues appeared since then.

So rather then trusting those guys fully, why not to take additional step and also encrypt our data, before sending them to cloud?  Additional encryption will not cost us much CPU time on current hardware (from tests – 11% of one core of old AMD CPU) and will not slow down transfers, because they are rather limited by Internet connection bandwidth.  And on Linux we have quite few quality encryption  tools like gpg or openssl, which can be relatively easily integrated into our backup/restore chains. In the rest of this article I’ll describe my PoC shell script, that backs up/ restores  whole directory to MEGA, while providing additional encryption / decryption on client side. 

The script does following:

  • create compressed archive of given directory ( tar cz)
  • splits archive into files of gives size
  • encrypts each file with AES 256
  • Calculates SHA1 checksums for each file
  • Stores files and their checksum on MEGA

Recovery is done similarly, taking steps in reverse direction.

There is also possibility to share this backup with somebody who does not have account on MEGA.  This is possible due to unique feature of MEGA – sharing links – each file in MEGA is encrypted with unique key ( which is then encrypted with your master key).  MEGA can export links with the keys, so recipient can download and decrypt the files ( but in our case it’ll be still encrypted with our additional encryption).   When backing up to MEGA with our script we can create so called manifest file, which contains links to files and also additional secret used for our private encryption.  If this file is shared somebody who has this script, he can easily download and restore the backup.

Script is designed for efficiency – processing data through piped streams, so it can handle large backups.

The script requires megatools – open source client for MEGA. And here is the script:

#!/bin/bash


BACKUP_DIR="/Root/Backup/"
PIECE_SIZE=10M
ACTION=store

trap "exit 2" SIGINT

if [[ $1 =~ -h|--help ]]; then
cat <<EOF
$0 [OPTIONS] DIRECTORY
Backups or restores directory to/from mega.co.nz.  Requires metatools to be installed.
Default action is to backup given directory.

-u|--user USER      mega user name (email)
-p|--password PWD   mega user password
-s|--secret SECRET  secret to be used for encryption/decryption of the backup
 --manifest FILE    backup manifest - can be created during   backup creation
                    manifest can be then used to download and restore backup
                    without knowing your mega login
--piece SIZE        size of backup piece (10M, 1G ... argument to split)
-r|--restore        restore backup from mega to given directory
-d|--download       download and restore directory from manifest
-h|--help           shows this help
EOF
exit 0
fi

while [[ $# > 1 ]]
do
key="$1"
case $key in
    -u|--user) # mega user
    USER="$2"
    shift 
    ;;
    -p|--password) # mega user password
    PWD="$2"
    shift 
    ;;
    -s|--secret) # encryption password
    ENC_PWD="$2"
    shift 
    ;; 
    --piece) # size of piece
    PIECE_SIZE="$2"
    shift 
    ;; 

    --manifest)  # backup manifest - cant be used to download files by anybody
    MANIFEST="$2"
    shift
    ;;
     -d|--download) # download using manifest
    ACTION=download
    ;;   
    -r|--restore) # download and restore data
    ACTION=restore
    ;;

    *)
            # unknown option
    ;;
esac
shift
done

function store {
    if [[ -n "$1" && -d "$1" ]]; then
    NAME=`basename $1`
    MEGA_PATH=$BACKUP_DIR$NAME
    

    megamkdir -u $USER -p $PWD $BACKUP_DIR 2>/dev/null
    megarm -u $USER -p $PWD $MEGA_PATH 2>/dev/null
    megamkdir -u $USER -p $PWD $MEGA_PATH

    tar -C $1  -czv . | split --filter "openssl aes-256-cbc  -e -k \"$ENC_PWD\" -md sha256 | tee >(sha1sum -b > $TMP_DIR/\$FILE.check) | cat > $TMP_DIR/\$FILE; megaput -u $USER -p $PWD --disable-previews --path $MEGA_PATH $TMP_DIR/\$FILE.check; megaput -u $USER -p $PWD --disable-previews --path $MEGA_PATH $TMP_DIR/\$FILE; rm $TMP_DIR/\$FILE; rm $TMP_DIR/\$FILE.check" -b $PIECE_SIZE - $NAME.

    if [[ -n $MANIFEST ]]; then
        echo $ENC_PWD > $MANIFEST
        megals -e -n $MEGA_PATH  >> $MANIFEST
    fi
    else
    echo "Please specify directory!" >&2
    exit 1
    fi
}

function restore {
    if [[ -n "$1"  ]]; then
        NAME=`basename $1`
        MEGA_PATH=$BACKUP_DIR$NAME
        mkdir -p $1
        FILES=`megals -u $USER -p $PWD -n $MEGA_PATH  | grep -v "\.check$"`
        if [[ -z "$FILES" ]]; then
            echo "Sorry no backup find in $MEGA_PATH" >&2
            exit 2
        fi

        (for f in $FILES; do
            megaget --no-progress -u $USER -p $PWD --path $TMP_DIR/$f.check $MEGA_PATH/$f.check 
            if [[ ! -f $TMP_DIR/$f.check ]]; then
                echo "Checksum file is missing for $f" >&2
                
                exit 4
            fi
            megaget -u $USER -p $PWD --path - $MEGA_PATH/$f |  tee >(sha1sum --status -c $TMP_DIR/$f.check ; if [[ $? != 0 ]]; then echo "ERROR $?">${TMP_DIR}ERROR; fi ) | openssl aes-256-cbc  -d -k "$ENC_PWD" -md sha256 
            rm  $TMP_DIR/$f.check
            if [[ -f ${TMP_DIR}ERROR ]]; then 
                echo "Checksum error for file $f" >&2
                exit 6
            fi
        done) | tar -C $1 -xzv
    else
        echo "Please specify directory!" >&2
        exit 1
    fi
}

function download {
    if [[ -z "$MANIFEST" ]]; then 
        echo "Must provide backup manifest file" >&2
        exit 3
    fi
    if [[ -n "$1"  ]]; then
        mkdir -p $1
        {
        read ENC_PWD 
        while { read PIECE_LINK PIECE_NAME; read CHECK_LINK CHECK_NAME;  }; do
            if [[ $CHECK_NAME != *.check || $PIECE_NAME != ${CHECK_NAME%.check} || -z $CHECK_NAME ]]; then
                echo "Invalid manifest file" >&2
                exit 8
            fi
            megadl --no-progress --path $TMP_DIR/$CHECK_NAME $CHECK_LINK 
            if [[ ! -f $TMP_DIR/$CHECK_NAME ]]; then
                echo "Checksum file is missing $CHECK_NAME" >&2| tar | tar -C $1 -xzv| tar -C $1 -xzv| tar -C $1 -xzv-C $1 -xzv
                exit 4
            fi

            megadl --path - $PIECE_LINK |  tee >(sha1sum --status -c $TMP_DIR/$CHECK_NAME ; if [[ $? != 0 ]]; then echo "ERROR $?">${TMP_DIR}ERROR; fi ) | openssl aes-256-cbc  -d -k "$ENC_PWD" -md sha256 
            rm  $TMP_DIR/$CHECK_NAME
            if [[ -f ${TMP_DIR}ERROR ]]; then 
                echo "Checksum error for file $PIECE_NAME" >&2
                exit 6
            fi
            
        done | tar -C $1 -xzv
        } <$MANIFEST
    else
        echo "Please specify directory!" >&2
        exit 1
    fi

}

if [[ ( -z "$USER" || -z "$PWD" || -z "$ENC_PWD" ) &&  $ACTION != "download" ]]; then
    echo "You must provide --user --pasword and --secret" >&2
    exit 3
fi

function cleanup {
rm -rf $TMP_DIR
}

trap cleanup EXIT

TMP_DIR=`mktemp -d`

case $ACTION in
    restore)
    restore $1
    ;;
    store)
    store $1
    ;;
    download)
    download $1
    ;;
esac


Usage is pretty simple:

To backup:

megaback.sh -u your_mega_username -p your_mega_password -s secret_password directory_to_backup

And then to restore:

megaback.sh -u your_mega_username -p your_mega_password -s secret_password -r directory_to_recover

Optionally you can backup and get manifest:

megaback.sh -u your_mega_username -p your_mega_password -s secret_password --manifest backup-details.txt directory_to_backup

The anybody having the manifest file and this scripts can recover backup:

megaback.sh -d --manifest backup-details.txt directory_to_restore

I personally tested with 32GB directory, it took some time ( several hours to backup, much longer more then half day to restore, looks like download speed from MEGA in much more limited), but generally works fine.

Testing Terminal Apps

$
0
0

Sometimes you need to test a terminal application, which reads user inputs from terminal and prints results to terminal.  These tasks are very common in introductory programming courses. Simple testing tool can help here, and students can learn good practices – automatic testing – from the very beginning.  I’ve been looking around and does not find anything, simple enough, that ie can be used by beginner and provide basic actions – for  testing output of program and supplying inpu to itt.  So I created such tool – simpletest. (written in Python, using pexpect)

You just need to create test script as text file, where lines are started by > (for expected output) or  < (for supplying input into program).  Here is trivial example of the test script:

$ tests/test2.sh
> Your wish:\\
< mys
> mys
? 0
---

For this script:

#!/bin/bash

read -p "Your wish:" WISH
echo $WISH


And here is result of running it:

$ stest tests/test2.txt 
0 $ tests/test2.sh
1 > Your wish:\\
2 < mys
3 > mys
4 ? 0
5 ---
All OK :-)

And here other scripts, which yields  error:

$ stest tests/echo-err.txt 
1 $ echo hi
2 > hou
PROGRAM ERROR at line 2 (> hou): Program ended before expected output, with this output: hi

Usage is very simple,  key advantage is that user can just copy interaction with program from terminal to text editor, quickly amened it and test script is ready.

There are couple more features – checking return code (?),  running program ($), line continuation (\\) and sending control control characters, which together provide everything one needs to create simple test cases. More in tool readme file.

Tool can be easily installed via pip ( if you do not have pip on your system you can install with sudo apt-get install python-pip on Debian/Ubuntu,  more details about installing pip):

# you'll need git to runn this
# sudo apt-get install git # on debian/ubuntu
sudo pip install git+https://github.com/izderadicka/simpletest.git#egg=simpletest


Download Email Attachments Automagicaly

$
0
0

Emails are still one of the most important means of electronic communication.  Apart of everyday usage with some convenient client ( like superb Thunderbird), from time to time one might need to get messages content out of the mailbox and perform some bulk action(s) with it – an example could be to download all image attachments from your mailbox into some folder – this can be done easily manually for few emails, but what if there is 10 thousands of emails?  Your mailbox is usually hosted on some server and you can access it via IMAP protocol. There are many possible  ways how to achieve this, however most of them require to download or synchronize full mailbox locally and then extract required parts from messages and process them.  This could be very inefficient indeed.   Recently I have a need for automated task like one above – search messages in particular IMAP mailbox,  identify attachments of certain type and name and download then and run a command with them, after command is finished successfully delete email (or move it to other folder).   Looking around I did not found anything suitable, which would meet my requirements (Linux, command line, simple yet powerful).  So having some experiences with IMAP and python, I decided to write such tool myself.   It’s called imap_detach, and you can check details on it’s page. Here I’d like to present couple of use cases for this tool in hope they might be useful for people with similar email processing needs.

Let’s start with simple example:

detach.py -H imap.example.com -u user -p password  -f ~/tmp/attachments/{year}/{from}/{name} -v 'attached'

This will download all attachments from all emails in user’s  inbox and save them in subdirectories – first grouped by year, then by sender. If there are many emails it can take quite some time. In some cases you might notice error messages complaining that output file isa  directory, which means that attachment does not have any name defined within the email.

This is resolved in next example by using more sophisticated naming of output file using {name|subject+section}  replacement ( | serves as ‘or’,  + joins two variables – so if attachment does not have name we use subject and section as a file name –  so it can look like “Important message_2.1″)

We also can try to add argument –threads, which will enable concurrent download of attachments in separate threads:

detach.py -H imap.example.com -u user -p password  -f ~/tmp/attachments/{year}/{from}/{name.subject_section}&nbsp; -v --threads 5 'attached'

In my tests with my gmail mailbox concurrent download with 5 threads was 3.7 times faster then single threaded ( downloading ~1200 files, ~450MB).

But we are not limited just to email attachments, all email parts are available to us.  What about to get all plain text parts and put them into one big file, which we can later use for some analysis :

detach.py -H imap.example.com -u user -p password -v -c "cat >> /home/you/tmp/emails.txt" -v 'mime="text/plain"'

We might be more specific on which messages to get – for instance we are interest just in junk messages from this year:

detach.py -H imap.example.com -u user -p password -v -c "cat >> /home/you/tmp/junk{year}.txt" -v 'mime="text/plain" & year=2015 & flags="Junk"'

Text message parts in an email can have different charsets encodings ( for instance for Czech language we can  have iso-8859-2 or win-1250 or UTF-8). The tool solves this by re-encoding text to UTF-8, so the in output file all text is in this charset.

Similarly we can look at messages  in other folders – say folder Spam and all it’s sub-folders and just look for text in first sub-part of the email message (that should be the text of the email) and getting only emails, where subject starts with “Re:”:

detach.py -H imap.example.com -u user -p password -v -c "cat >> /home/you/tmp/spam.txt" -v --folder "Spam**" 'mime="text/plain" & (section="1" | section~="1.") & subject^="re:"'

And what about finding all links in your mailbox (with a bit of quote escape madness):

detach.py -H imap.example.com -u user -p password -v -c 'grep -ioP '\''<a .*?href=["'\'\\\'\''][^"'\'\\\'\'']+["'\'\\\'\'']'\'' | sed -r '\''s/.*href=["'\'\\\'\'']([^"'\'\\\'\'']+)["'\'\\\'\'']/\1/i'\'' >> /home/you/tmp/links.txt' 'mime="text/html"'

Or using fairly complex filter:

detach.py -H imap.example.com -u user -p password -v -f "/home/you/tmp/{name|subject+section}" -v '(mime="application/pdf" & ! from ~= "bill" & ! cc~="james" & size>100k & size<1M) | (mime="image/png" & ! name^="bi" & from~="bill") | (mime^="image" & (name$="gif" | from~="matt"))'

And there are many more possibilities – check details on the tool home page.


Farewell Django

$
0
0

Recently I’ve been reviving 2 years old Django application (myplaces)  (from version 1.5.5 to latest version 1.9) and I was very unpleasantly surprised how tedious it was.   As Django  evolved  some features got deprecated and removed and must have been replaced in the code.  And it’s not only Django but also other contributed libraries are evolving as rapidly.   In my application I was using django-rest-framework,  which changed so significantly in version 3, that I cannot use it in my application without basically rebuilding the whole application.

Some of the changes might be necessary, but many where just cosmetic changes in names ( mimetype -> content_type, etc.), which I do not see as much of value add.  Even core python still keeps bit of naming fuss in favour of backward  compatibility ( for instance string.startswith, string.endswith made it till ver.3,  even if they are not in line with PEP008 – python naming standards).

But it’s not only about changes of interface between versions (there is a fair process to deprecate features so when one follows development,  it’s relatively easy to stay up to date), but it’s mainly all concept of the Django. Django was created more then 10 years ago, when web development was focused around servers and everything happened there.  But situation changed radically ( as I have written some time ago).  Now a lot of things is happening in the browser and you can have complete applications running  there (recently I discovered this cool application, which is running almost completely in the browser, it’s just using  a stream of events from the server).  Accordingly servers now are used more to provide APIs to browser applications or to route real time communication to/from/between browsers.

Theoretically you can do all this new great stuff in Django (as I have tried  in myplaces application), however it always needs some add-ons (django-rest-framework for RESTfull API,  gevent-socketio for websockets and socket-io real time communication) and overall it does not feel so great, because new stuff have to match with the old concepts.  Django is quite large and rather monolitic framework, so anything added to it must really try hard to fit in.  As a result new features are bit artificial,  and you need to really understand Django well to see how they should be used.

So where this  article is leading to?  For me to the simple conclusion that I’ll try to avoid Django in my future projects. It has been nice 8 years or so and I’ve learned a lot, but it’s time to move on.

There are surely now many valuable alternatives to Django.  In python world it’s for instance Flask, which I have used in couple of ,y recent small projects.  Flask is generally much more lighter then Django, so it’s easy to start a project and whole development there feels much more ‘natural’.  Of course out of box it does not provide so much functionality as Django, but what is these feels really good ( configuration, Jinja2 templates, session management etc.). And it’s easy to add functionality from tons of available extension ( like advanced authentication and SSO with SAML2, which I used recently).  There is a risk there that Falk does not so firmly control the application architecture as the Django does, so one can easily get  into real mess, but on the other hand can customize application  for specific use cases or technologies more easily ( like using No-SQL data stores).

Outside of Python world there are many interesting possibilities, for instance now very popular Node.js with it’s apps servers like Express.js, Loopback, which enable by default many new technologies and approaches (see this post by Django contributing author Jacob).  Or for curious seekers like myself there are other more weird and technically interesting web frameworks like Eliom (see this article about my experieces with Eliom) or something even more obscure like Opa (again see my article about Opa experiences).

Farewell, Django, king of web frameworks, whose long and faithful friendship those who knew you won’t forget! “

Openshift – Second Thoughts

$
0
0

Openshift Online still remains one of most generous Paas offerings on the market. With 3 free containers it’s really good bargain. Recently I’ve modified  couple of my older applications to run in Openshift (myplaces and iching) to run in Openshift.

Previously I’ve created pretty standard and simple Flask application and deployed it on Openshift. The process was pretty straightforward as described in this article. However now situation was different, because both applications are special.

myplaces is python application in Django, but it requires additional process as backend computational server.  Web process communicates with backend server via ZMQ sockets. Also application requires web socket communication with socketio messaging ( to update import status), so it cannot run in classical WSGI sever ( rather it runs in gevent sever).  So I have to use custom catridge for python.

iching application is written in OCAML and Ocsigen, which not very common technology, so it also required custom cartridge ( I used this one, but had to modify it slightly).

Generally experience was far from smooth, with quite a few peculiar issues, to name few:

  • python pip install  was not working by default because Openshift is using different repositories ( I have to redirect explicitly to official pypi repos).
  • start, stop action hooks did not work for python app ( but they do for OCAML one).
  • Took me some time to realize where to run Django specific tasks like manage.py migrate
  • Deployment behaves differently when it runs as git hook or as enc rhc app deploy command or within ssh shell. (For instance I could not really get lxml installed as part of regular deploy process, but it installed without any problems in ssh shell. For OCAML compilation there were  significant differences between git initiated deployment and deployment via rhc tool – finally I had to use rhc tool to make things work).
  • Installing of missing development libraries (libpcre in my case) was rather tedious – basically you have to supply script to download source and compile it.
  • Environment variables like PATH, LD_LIBRARY_PATH, PKG_CONFIG_PATH etc. must be set correctly in all environments – which was not always the case – so I had to fix manually ( for instance custom python cartridge had incorrect LD_LIBRARY_PATH in ssh shell, which caused error when running python).

Finally I got both applications running on Openshift, but comparing with Docker (I also made Docker containers for both applications) it was much harder effort. Probably if I’ve learned more about Openshift platform, it could have been easier,  but considering that their future versions are abandoning  current model and moving towards Docker containers, it would not worth do dig deeper into Openshift Online technologies, because they are already past now and Docker seems to be the future.

Curious reader can look at source code (with Openshift and  Docker integration) of both applications here: myplaces, iching.

Cython Is As Good As Advertised

$
0
0

I’ve have been aware of Cython for a few years but newer had chance to really test it in practice (apart of few dummy exercises).  Recently I’ve decided to look at it again and test it on my old project adecapcha. I was quite pleased with results, where I was able speed up the program significantly with minimum changes to the code.

I used following approach to improve the app performance with Cython:

  1. Profile the application (or it’s part) –  with cProfile and gprof2dot to give nice graphical view of computing time split across functions. (Alternatively you can use  pyvmmonitor, which nicely integrates with PyDev or PyCharms).  Below is the profiling result of adecaptcha before Cython optimalization:
    original
    Here we can see two branches, which took majority on program time – one is for loading audio file, but it’s spending most of its time in Python standard module wave.  However the second branch is completely  under our control.  We can see that a lot of time is spent in twin and wf functions ( triangular window calculations).
  2. Let’s look at functions identified by profiling:
    def twin(start,stop):
        def wf(len):
            for n in xrange(len):
                yield 1.0 - np.abs(((len-1)/2.0 -n)/ ((len)/2.0))
                
        len=stop-start
        return np.array(list(wf(len)))

    This is obviously not very efficient code (could be marginally optimized by using list comprehension expression – but performance will be approximately the same  –  24% of total time vs 27%).
  3. To introduce significant performance change we have to implement this function in Cython:
    cdef extern from "math.h":
        double fabs(double x)
        
    ctypedef np.double_t DTYPE_t
    
    def twin(start, stop):
        cdef: 
            np.ndarray[DTYPE_t] arr
            int n
            int len=stop-start
    
        arr=np.zeros(len)
        for n in range(len):
            arr[n]= 1.0 - fabs(((len-1)/2.0 -n)/ (len/2.0))
        return arr

    As you can see the changes are minimal, we just reimplemented twin function, this time with statically typed loop control variable and numpy array.
  4. Profile again to see changes:
    optimized
    As you can see twin function is not an issue any more ( all calc_mfcc branch is now basically spend in FFT calculation).

Conclusions

Even with few very simple changes into original code I was able to achieve significant performance improvements (run time 0.27s vs 0.41s – for one audio captcha, that’s app. 35 % improvement).
Programming in Cython is relatively easy so I was able to implement these changes quickly, without particular issues.  Complication errors were fairly well described, so I was able to fix problems quickly. Building can be defined in setup.py in a straightforward manner or can be even automatic ( with pyximport – however pyximport machinery takes some time – so for smaller programs manual compilation is more effective).

Overall I was quite impressed and looking forward to use Cython in future projects.

Parsing PDF for Fun And Profit (indeed in Python)

$
0
0

PDF documents are ubiquitous in today’s world. Apart of common use cases of printing, viewing etc. we need sometimes do something specific with them- like convert tehm to other formats or extract textual content.  Extracting text from PDF document can be (surprisingly) hard task due to the purpose and design of PDF documents.  PDF is intended to represent exact visual representation of document ‘s pages down to the smallest details. And internal representation of document text is following this goal.  Rather the storing text in some logical units (lines, paragraphs, columns, tables …), text is represented as series of commands, which print characters (can be a single character, word, part of line, …) at exact position on the page with given font, font size, color, etc.   In order to reconstruct original text logical structure program  has to scan  all these commands and join together texts, which were probably forming same line or same paragraph.  This task can be pretty demanding and ambiguous –  mutual position of text boxes can be interpreted in various ways ( is this space between words too large because they are in different columns or line is justified to both ends?).

So the task of text extraction looks quite discouraging to try, luckily some smart guys have tried it already and left us with libraries that are doing pretty good job and we can leverage them. Some time ago I’ve created tool called PDF Checker, which does some analysis of PDF document content (presence, absence of some phrases,  paragraphs numbering, footers format etc.). I used there excellent Python PDFMiner library.   PDFMiner is a grea tool and it is quite flexible, but being all written in Python it’s rather slow.   Recently I’ve been looking for some alternatives,  which have Python bindings and provide functionality similar to PDFMiner.  In this article I describe some results of this search, particularly my experiences with libpoppler.

Requirements

In order to analyze  in detail text of PDF document I require to:

  • get number of pages in PDF document and for each page its size
  • extract text from the page, ideally grouped to lines and paragraphs (boxes)
  • get bounding boxes of text items (down to individual characters) to analyze text based on it’s position on the page – header/footer, indentation, columns etc.
  • get font name, size and color, background color  – to identify headers, highlights etc.

PDFMiner library

PDFMiner library was my first attempt, so generally most of requirements are derived from its interface.  The only things which are really missing there are font and background colours.  Here is an example how to dump text content of PDF file together with its position on the page and format:

from pdfminer.pdfparser import PDFParser
from pdfminer.pdfpage import PDFPage
from pdfminer.pdfdocument import PDFDocument
from pdfminer.pdfinterp import PDFResourceManager, PDFPageInterpreter
from pdfminer.converter import PDFPageAggregator
from pdfminer.layout import LAParams, LTTextBox,LTChar, LTFigure
import sys

class PdfMinerWrapper(object):
    """
    Usage:
    with PdfMinerWrapper('2009t.pdf') as doc:
        for page in doc:
           #do something with the page
    """
    def __init__(self, pdf_doc, pdf_pwd=""):
        self.pdf_doc = pdf_doc
        self.pdf_pwd = pdf_pwd

    def __enter__(self):
        #open the pdf file
        self.fp = open(self.pdf_doc, 'rb')
        # create a parser object associated with the file object
        parser = PDFParser(self.fp)
        # create a PDFDocument object that stores the document structure
        doc = PDFDocument(parser, password=self.pdf_pwd)
        # connect the parser and document objects
        parser.set_document(doc)
        self.doc=doc
        return self
    
    def _parse_pages(self):
        rsrcmgr = PDFResourceManager()
        laparams = LAParams(char_margin=3.5, all_texts = True)
        device = PDFPageAggregator(rsrcmgr, laparams=laparams)
        interpreter = PDFPageInterpreter(rsrcmgr, device)
    
        for page in PDFPage.create_pages(self.doc):
            interpreter.process_page(page)
            # receive the LTPage object for this page
            layout = device.get_result()
            # layout is an LTPage object which may contain child objects like LTTextBox, LTFigure, LTImage, etc.
            yield layout
    def __iter__(self): 
        return iter(self._parse_pages())
    
    def __exit__(self, _type, value, traceback):
        self.fp.close()
            
def main():
    with PdfMinerWrapper(sys.argv[1]) as doc:
        for page in doc:     
            print 'Page no.', page.pageid, 'Size',  (page.height, page.width)      
            for tbox in page:
                if not isinstance(tbox, LTTextBox):
                    continue
                print ' '*1, 'Block', 'bbox=(%0.2f, %0.2f, %0.2f, %0.2f)'% tbox.bbox
                for obj in tbox:
                    print ' '*2, obj.get_text().encode('UTF-8')[:-1], '(%0.2f, %0.2f, %0.2f, %0.2f)'% tbox.bbox
                    for c in obj:
                        if not isinstance(c, LTChar):
                            continue
                        print c.get_text().encode('UTF-8'), '(%0.2f, %0.2f, %0.2f, %0.2f)'% c.bbox, c.fontname, c.size,
                    print


if __name__=='__main__':
    main()

As you can see with a very simple wrapper class around PDFMiner  library we can easily iterate PDF document text down to individual characters, each level provides exact position information, lowest level provides also font information.

PDFMiner is very flexible, you can set few parameters to control layout analysis and thus fine tune text parsing to your need. But as already said PDFMiner is quite slow, does not provide font colour information and also does not support python 3.

 libpoppler with GObject Introspection interface

Poppler is a PDF rendering and parsing library based on the xpdf-3.0 code base. It’s now hosted as part of freedesktop.org and is actively maintained. libpoppler is used in many opensource PDF tools (Evince, Okular, GIMP, …) and provides rich functionality for both parsing and rendering.

Poppler package  contains GObject Introspection binding, which means it can be used from scripting languages like Python or Javascript.  However there is significant issue with introspection for one function, which is used for getting positions of text on the page – so workaround has to be used in this area.

Below is code that dumps PDF text in a similar way to script with PDFMiner:

from gi.repository import Poppler, GLib
import ctypes
import sys
import os.path
lib_poppler = ctypes.cdll.LoadLibrary("libpoppler-glib.so.8")

ctypes.pythonapi.PyCapsule_GetPointer.restype = ctypes.c_void_p
ctypes.pythonapi.PyCapsule_GetPointer.argtypes = [ctypes.py_object, ctypes.c_char_p]
PyCapsule_GetPointer = ctypes.pythonapi.PyCapsule_GetPointer

class Poppler_Rectangle(ctypes.Structure):
    _fields_ = [ ("x1", ctypes.c_double), ("y1", ctypes.c_double), ("x2", ctypes.c_double), ("y2", ctypes.c_double) ]
LP_Poppler_Rectangle = ctypes.POINTER(Poppler_Rectangle)
poppler_page_get_text_layout = ctypes.CFUNCTYPE(ctypes.c_int, 
                                                ctypes.c_void_p, 
                                                ctypes.POINTER(LP_Poppler_Rectangle), 
                                                ctypes.POINTER(ctypes.c_uint)
                                                )(lib_poppler.poppler_page_get_text_layout)

def get_page_layout(page):
    assert isinstance(page, Poppler.Page)
    capsule = page.__gpointer__
    page_addr = PyCapsule_GetPointer(capsule, None)
    rectangles = LP_Poppler_Rectangle()
    n_rectangles = ctypes.c_uint(0)
    has_text = poppler_page_get_text_layout(page_addr, ctypes.byref(rectangles), ctypes.byref(n_rectangles))
    try:
        result = []
        if has_text:
            assert n_rectangles.value > 0, "n_rectangles.value > 0: {}".format(n_rectangles.value)
            assert rectangles, "rectangles: {}".format(rectangles)
            for i in range(n_rectangles.value):
                r = rectangles[i]
                result.append((r.x1, r.y1, r.x2, r.y2))
        return result
    finally:
        if rectangles:
            GLib.free(ctypes.addressof(rectangles.contents))

def main():
    
    print 'Version:', Poppler.get_version()
    path=sys.argv[1]
    if not os.path.isabs(path):
        path=os.path.join(os.getcwd(), path)
    d=Poppler.Document.new_from_file('file:'+path)
    n=d.get_n_pages()
    for pg_no in range(n):
        p=d.get_page(pg_no)
        print 'Page %d' % (pg_no+1), 'size ', p.get_size()
        text=p.get_text().decode('UTF-8')
        locs=get_page_layout(p)
        fonts=p.get_text_attributes()
        offset=0
        cfont=0
        for line in text.splitlines(True):
            print ' ', line.encode('UTF-8'),
            n=len(line)
            for i in range(n):
                if line[i]==u'\n':
                    continue
                font=fonts[cfont]
                while font.start_index > i+offset or font.end_index < i+offset:
                    cfont+=1
                    if cfont>= len(fonts):
                        font=None
                        break
                    font=fonts[cfont]
                
                bb=locs[offset+i]
                print line[i].encode('UTF-8'), '(%0.2f, %0.2f, %0.2f, %0.2f)' % bb,
                if font:
                    print font.font_name, font.font_size, 'r=%d g=%d, b=%d'%(font.color.red, font.color.green, font.color.blue),
            offset+=n
            print       
        print
        #p.free_text_attributes(fonts)

if __name__=='__main__':
    main()

Comparing to PDFMiner solution it doesn’t provide aggregation on text box or text line level – lines should be reconstructed from page text.  But it provides color (but not background colour) of the font for individual characters.

libpoppler with custom Python binding

Recently I’ve learned more about Cython so I decided to give it a try and create my own interface to libpoppler. Actually it was not so difficult and quite quickly I was able to create  Python binding, which I can use easily as the replacement for PDFminer in my project.   The most notable difference is reversed orientation of y-axis ( PDFminer has 0 at page bottom, here it is at page top).  Below is the sample code for dumping PDF text (with position and font information):

import pdfparser.poppler as pdf
import sys

d=pdf.Document(sys.argv[1])

print 'No of pages', d.no_of_pages
for p in d:
    print 'Page', p.page_no, 'size =', p.size
    for f in p:
        print ' '*1,'Flow'
        for b in f:
            print ' '*2,'Block', 'bbox=', b.bbox.as_tuple()
            for l in b:
                print ' '*3, l.text.encode('UTF-8'), '(%0.2f, %0.2f, %0.2f, %0.2f)'% l.bbox.as_tuple()
                #assert l.char_fonts.comp_ratio < 1.0
                for i in range(len(l.text)):
                    print l.text[i].encode('UTF-8'), '(%0.2f, %0.2f, %0.2f, %0.2f)'% l.char_bboxes[i].as_tuple(),\
                        l.char_fonts[i].name, l.char_fonts[i].size, l.char_fonts[i].color,
                print

As you can clearly see the source code is the shortest, yet still provides all necessary data, including font colour (but not background colour).  Apart of being significantly faster ( see below for detailed benchmarks),  it seems to be more reliable then PDFMiner (it solved few issues where PDFminer behaved strangely).

Benchmarks

I’ve done simple benchmarks of these three scripts, time is measured by time linux utility as mean of 3 runs (after initial run to exclude possible caching effects), output is directed to /dev/null to exclude terminal printing time. Benchmarks runs on my notebook with Ubuntu 14.04 64 bit, Core i5 CPU @ 2.70GHz and 16GB memory:

libppopler with cython libpoppler with GI binding pdfminer
tiny document (half page) 0.033s 0.098s 0.121s
small document (5 pages) 0.141s 0.499s 0.810s
medium document (55 pages) 1.166s 4.860s 10.524s
large document (436 pages) 10.581s 34.621s 108.095s

As you can see custom libpoppler binding with Cython is about 3x faster then GObject introspection interface and  10x times faster then PDFMiner (for large documents).

Conclusions

Custom interface to libpoppler is the clear winner in all aspects – performance, code simplicity / pythonic interface and reliability.  I’ll be using it in my further projects.

My Python libpoppler binding is freely available on github under GPL v3 license ( as libpoppler is GPL licensed too) and you are invited to try it.  I’d like to hear your feedback.

Starting with Aurelia – Pagination with Back and Sort

$
0
0

I do not like very much programming of User Interfaces (UIs) and frankly spoken I’m not very good at that, but alas sometimes UIs are necessary so I have to try my best. Many recent applications use web browser as UI, and  situation here is  quite messy ( see this nice article about JS Frameworks Fatigue).  Last time I was involved with web UIs I had utilized Backbone with Django based RESTful server.  Recently I’ve decided to rewrite MyBookshelf application with modern technonogies (it’s about 8 years old, which is something like prehistory considering changes in web development).  New architecture should be based on RESTful services and Single Page Application (SPA) relying on recent browser capabilities.   I’ve have been looking around and found that Backbone is already almost forgotten and we have two new stars on the stage – AngujarJS and React – I have very quickly looked at both and finally decide for another framework Aurelia.

Why not AngularJS or React?

AngularJS is moving to AngularJS2, which is significantly different form previous version and not compatible.  So it probably worth to start directly with AngularJS2 – however I somehow did not like it’s syntax and overall approach – it looked bit complicated and inconsistent, relying on experiences from previous version, which I have not tried.

React is only View layer ( so it’ll require other libraries for router, their fancy flux pattern etc.) and it’s Facebook product. Maybe it’s just my prejudice, but I try to avoid everything related to this company (however generally people are quite positive about React).

Why Aurelia

Aurelia got some publicity last year and it has been highly prised as well designed, next generation web UI framework.  Generally from what I’ve seen it looked attractive so I give it a try. You can check this cool video, where creator and chief architect of Aurelia  Rob Eisenberg introduces the framework.

What I liked

  • Based on latest Javascript (ES6, ES7) – so basically by learning Aurelia, you are also learning new and future Javascript, which generally feels much better, with a lot of advanced language features present by default.  (in order to use latest JS project has to be compiled(transpiled) with Babel).
  • Consistent and compact grammar –   majority is just plain modern JavaScript. I particularly like decorations, because I’m used to them from Python and they are very easy to use and understand. Extensions to HTML (for view templates) are nicely designed and easy to remember (simply named attributes as value.bind, repeat.for, if.bind, ref etc.).
  • Convention over configuration – conventions  are easy to understand, logical, so it’s no problem to follow them and they save your time.
  • Template binding – MVVM architecture is easy to understand and supports decomposition of UI into reusable components.
  • Basically all solutions and concepts in Aurelia are ‘natural’ and understandable –  if you think it should work in this way it usually does.
  • Batteries included – Aurelia aims to provide complete framework, with all necessary components included.  (However this is not completely true today,  as some libraries are in early stages of development and I have not seen comprehensive widgets library for Aurelia).
  • Although Aurelia tries to be self-contained , it can be integrated with other libraries ( for instance boostrap in already included by default, others like JQueryPolymer can be integrated).  Aurelia is also very modular, so any part can be customized, replaced if needed.
  • Although it not directly related to this framework, it was first time I used BrowserSync and it looks like very powerful tool for testing and experimenting with code and I liked it very much .  All changes are automatically reloaded into browser, which helps a lot.

What I did not like

  • There is only limited amount of documentation, so you are left very much on your own. Apart of basic “Getting Started” there is very little detailed documentation. API reference is minimal.  Articles on the web are often outdated due to massive development  of the framework in last year.
  • Key concepts are not well explained –  you can see some examples, but for real work  you need to understand core concepts of this framework like  detailed flow of binding, differences between various options (for instance using component directly vs composing), when view models properties could be used directly and when they have to decorated with @bindable. How  property getters should be used and what is advantage of decorating them with composedForm, how components can be interconnected (observers, events, signals …) etc.
  • Learning experience for somebody without exposure to most recent frameworks (e.g. AngularJS etc.) could be quite steep.
  • It’s still not production ready, but it’s getting there.
  • Requires a lot of tools to support it. For one not so familiar with Node and current JS tools stack it’s another layer of complexity.
  • Framework is quite large (even small app can have 1M) –   so it can be problem for older devices and for slow connections.
  • I got into some issues with browsers –  In Firefox some strange interaction with Firebug, which resulted in mysterious errors.  On Chromium fetch requests freeze in pending state randomly.
  • Without deeper understanding of component lifetime and data binding I was sometimes surprised how things finally worked (bindings did not changed when expected, or changed too early from undefined to null and only then to final value,   behaviour of components differs based on way how page was routed etc.)

Getting started

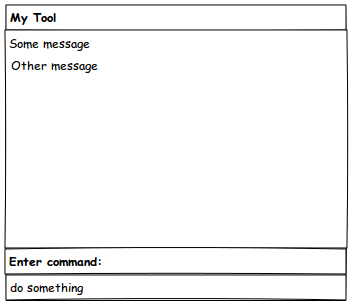
The official documentation gives you quick way to start up with a mock-up application, which has some basic navigation and a page, which consumes RESTful API.  Similar app can be cloned from github aurelia-skeleton, but from then you are left to your own skill and to yet limited documentation.

One of features I required, was flexible pagination, which:

  • is general and can be used on various data sources
  • is native to Aurelia (use core Aurelia components)
  • supports browser back button – so I can go to an item detail and then back to the given page
  • supports sorting of paginated list
  • can be embedded on various pages
  • displays spinner when next page is loaded from server

There are few existing plugins for Aurelia, but none really matched my requirements, so I decided to create my own solution, thinking that it could be good learning exercise.

Pagination solution

Our pagination solution is split into 3 components:

  • page-controller –  controls loading of pages from given resource
  • pager – navigation components, which allows to load previous and next pages etc.
  • sorter – select box, which allows to select required sorting of results

Let’s start with sorter. It’s fairly simple components –   a select box with a given list of possible sortings for our data.  Each Aurelia component has two parts – view model, which wraps access to data and some logic related to presentation of data. View model is basically plain JavaScript class (using ES6/7 syntax):

import {
  bindable,
  LogManager
} from 'aurelia-framework';
const logger = LogManager.getLogger('sorter');

export class sorter {
  @bindable sort;
  @bindable sortings;

  constructor() {
    if (history.state) {
      const state = history.state;
      logger.debug('restoring sorter back to ' + JSON.stringify(state));
      if (state.sort) {
        this.sort = state.sort;
        logger.debug(`sort is ${this.sort}`);
      }
    }
  }

}

There is not very much logic in this component –  it has two properties: sortings – which contains a list of all possible sortings of data and current sort.  Both are bindable – so they can be bound to value in view template – see below.  One special thing is that sort if restored from history.state if that is available. As per my current knowledge best place to do this seems to be constructor of the class (because it does not yet propagate changes through observers – so component is just preset to this value). You can also see a way how logging is supported in Aurelia via LogManager, which is pretty standard way similar to logging solutions in other frameworks and languages.

The view template for sorter is also pretty simple:

<template>
  <select value.bind="sort">
    <option repeat.for="sorting of sortings" value="${sorting.key}">${sorting.name}</option>
  </select>
</template>

It’s just HTML select element with few extra attributes, which are basically self explanatory.

Another component is pager, which displays page navigation – in our case has just two buttons – Next and Previous, but could be easily extended to show page numbers. Again it has two parts, view model:

import {inject,DOM, bindable} from 'aurelia-framework'
import {LogManager} from 'aurelia-framework';
const logger = LogManager.getLogger('pager');

@inject(DOM.Element)
export class Pager{
  @bindable page;
  @bindable lastPage;
  @bindable loading = false;

  constructor(elem) {
    this.elem=elem;
  }

  activated() {
    logger.debug('Pager activated');
  }

  nextPage() {
    if (this.page < this.lastPage && ! this.loading) this.page++;
  }

  prevPage() {
    if (this.page >1 && ! this.loading) this.page--;
  }

  get nextPageNo() {
    return Math.min(this.lastPage, this.page+1)
  }

  get prevPageNo() {
    return Math.max(this.page-1, 1)
  }

  get isFirstPage() {
    return this.page===1
  }

  get isLastPage() {
    return this.page === this.lastPage || ! this.lastPage
  }
}

It contains a bunch of helper functions and properties for the view. One notable thing is that we are using Dependency Injection (DI) support of the framework to inject reference to root element of the rendered view. Actually it not  needed here, but it’s left for possible future use.

Corresponding view template is:

<template>
  <nav>
  <ul class="pager">
    <li if.bind="!isFirstPage"><a href="#" click.delegate="prevPage()"
      title="Page ${prevPageNo}"><i class="fa fa-caret-left"></i> Previous</a></li>
    <li if.bind="!isLastPage"><a href="#" click.delegate="nextPage()" 
       title="Page ${nextPageNo}">Next <i class="fa fa-caret-right"></i> </a></li>
  </ul>
  <div style='width:100%'>
    <span class="pager-spinner"  if.bind="loading"><i  class="fa fa-spinner fa-spin fa-2x"></i></span>
  </div>
</nav>
</template>

You can see conditional display of several elements with if.bind  and handling of DOM events with click.delegate.  Both refer to available members of the view model.

Finally we have page-controller component, which is responsible for loading appropriate data page for us, based on page number and sorting value. This component does not have any view template, it’s just responsible to load correct data:

import {bindable, processContent, noView, inject, customElement, computedFrom} from 'aurelia-framework'
import {LogManager} from 'aurelia-framework';
const logger = LogManager.getLogger('page-controller');

@noView()
@processContent(false)
@customElement('page-controller')
export class PageController {
  @bindable page=1;
  @bindable sort;
  lastPage;
  @bindable pageSize = 10;
  loading=false;
  data=[];
  @bindable loader = () => Promise.reject(new Error('No loader specified!'));
  @bindable noSort=false;

  constructor() {
    logger.debug('Constructing PageContoller');

    if (history.state) {
      const state=history.state;
      logger.debug('restoring page-controller back to '+JSON.stringify(state));
      if (state.page && state.page != this.page) {
        this.page=state.page;
      }
      if (state.sort) {
        this.sort=state.sort;
        logger.debug(`sort2 is ${this.sort}`);
      }
    }
    }

  created(owningView, myView) {
    logger.debug('Creating PageController');
  }
  bind(ctx) {
    logger.debug(`Binding PageController`);
    // if status is restored from history change to page will not happen so we need to load page here
    if (history.state && history.state.page || this.noSort) this.loadPage(this.page);

  }
  attached() {
    logger.debug('PageController attached');
  }

  loadPage(page) {
    //if (this.loading) return Promise.resolve(null);
    logger.debug(`Loading page ${page}, ${this.sort} by ${this.loader.name}`);
    this.loading=true;
    return this.loader(page, this.pageSize, this.sort)
      .then(({data,lastPage}) => { this.data=data;
                                this.lastPage=lastPage },
            err => logger.error(`Page load error: ${err}`))
      .then(() => this.loading=false);
  }

  pageChanged(newPage) {
    logger.debug('page changed '+newPage);
    this.loadPage(this.page)
    .then(() => {history.replaceState({...(history.state || {}), page:this.page, sort:this.sort}, '')});
  }

  sortChanged(newValue, old) {
    logger.debug(`sort changed ${this.sort}`);
    this.reset();

  }

  loaderChanged() {
    logger.debug('Loader changed in PageController');
    this.reset();
  }

  reset() {
    const oldPage=this.page;
    this.page=1;
    if (oldPage==1) this.pageChanged(1,1);
  }

  @computedFrom('data')
  get empty() {
    return ! this.data || this.data.length==0;
  }

}

As this view model will not be rendered we can support this via noView decorator, also we do not care about page-controller element content ( processContent(false) decorator).   The last decorator customElement can be used to give custom name to element corresponding to this view model.

On lines 9-16 we have few properties to control pagination including data representing current page. In constructor we restore state from history.  This state is actually set on line 61, when page changes (using history.replaceState not to pollute browser history, just to refer to last page seen).

Apart of the constructor we have several method, which are called back during component life cycle. These are good examples of Aurelia conventions. Life cycle is basically  constructor -> created -> bind -> attached. bind is used here to load initial page, rest is there just for debug purposes.

Another examples of Aurelia conventions are ...Changed(oldValue, newValue) methods on lines 58-73, which are called every time observable property changes.  We use them to load new page when either page number, sorting, or data loader changes.

Pages are loaded in method loadPage on lines 47-56.  It uses bound function – loader, which should return Promise (loader function is basically some kind of wrapper around Aurelia HttpClient).

Finally we need a page, where all three components  are used together, let’s start with view template first:

<template>
  <require from="components/authors"></require>
  <section>
    <div class='container-fluid items-header'>
      <h3 class="page-title">Ebooks (${paginator.page}/${paginator.lastPage})
    <div class='sorter' if.bind="sortings.length">
      <label class="sorter-label"><i class="fa fa-sort"></i></label>
      <sorter  sortings.one-time="sortings" view-model.ref="sorter"></sorter>
    </div>
    </h2>
  </div>
  <page-controller view-model.ref='paginator' loader.bind="loader" sort.bind="sorter.sort" page-size="12" no-sort.bind="!sortings.length"></page-controller>

    <div class="container-fluid">
      <div class="row">
        <div class="col-sm-6 col-md-4 col-lg-3" repeat.for="ebook of paginator.data">
          <div class='ebook-detail'>
            <authors authors.one-time="ebook.authors" compact.bind="true"></authors>
            <div class="ebook-title"><a href="#/ebook/${ebook._id}">${ebook.title}</a></div>
            <div class="ebook-series" if.bind="ebook.series">${ebook.series} #${ebook.series_index}</div>
          </div>
        </div>
      </div>
    </div>

  <pager page.two-way="paginator.page" last-page.bind="paginator.lastPage" loading.bind="paginator.loading"></pager>
    </section>

</template>

Since our pagination components are available as a feature in the application we do not have to import them via <require>.

Here we just  need to connect these three components together- we can use ref attribute to reference component within this template. Plain ref attribute  references rendered element, view-model.ref its view model, which is what we need here. We bind sorter.sort to page-controller (which is referenced as paginator) and paginator.page to pager – in this case we need two way binding –  page.two-way, because page can change either internally in pager ( by navigation to other page) or externally as change in sorting of data or binding new data loader.

loader and sorting are provided by view model for this page:

import {inject, bindable, LogManager} from 'aurelia-framework';
const logger=LogManager.getLogger('ebooks-panel');

@inject(ApiClient)
export class Ebooks {
  @bindable sortings=[{name:'Title A-Z', key:'title'}, {name:'Title Z-A',key:'-title'}];
 
  constructor(client) {
    this.client=client
  }
  activate(params) {
    logger.debug(`History State ${JSON.stringify(history.state)}`);
  }

  get loader() {
    return this.client.getMany.bind(this.client, 'ebooks');
  }
}

loader is just providing method from our custom wrapper around HttpClient to interface our RESTful API:

getMany(resource, page=1, pageSize=25, sort, extra='') {
    const url='/'+resource+`?page=${page}&max_results=${pageSize}` +
      (sort?`&sort=${sort}`:'')+extra;
    return this.http.fetch(url)
      .then(response => response.json())
      .then(data => {let lastPage=Math.ceil(data._meta.total / pageSize);
                    return {data:data._items, lastPage:lastPage}})
  }

 Conclusions

Aurelia appears to be a promising framework, which very much make a sense.  It’s still in early stages (beta), but everything works quite well.  For me as non expert in recent Web UI development more detailed documentation, explaining in detail core concepts and providing best practices is sorely missing.

As per pagination component, I’m sure it can be done better, when one gets more insight into the framework. Now for instance there is a problem when switching between pages with sub path – like #/search/aaa to search/bbb –   pagination works, but it’s not restored to last page  when back button is used (because components are already displayed so constructor is not called).

For curious readers source code is on github.

I’d like very much hear comments, experiences and advices from other Aurelia users.

Viewing all 83 articles
Browse latest View live


Latest Images